ALTOX SERVER 2.0
User Manual for the GPS-GLONASS Transport Monitoring Online System

Contents
User Sign Up and Account Settings
1. Click on the link Enter the Monitoring System.
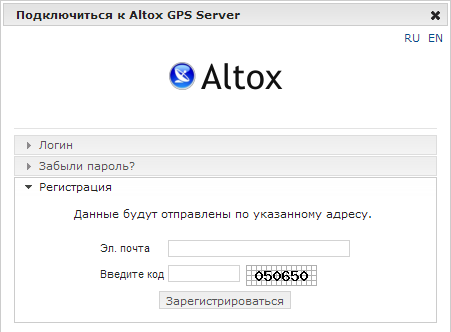
2. In the new window go to the Sign Up (Регистрация) tab, then enter your email, anti-spam code and click the Sign Up (Зарегистрироваться) button. You will receive an email to the email address that you entered. The email message will have the password to Altox Server 2.0 GPS-GLONASS monitoring system.
3. Go to Login (Логин) tab, enter email address you used for signing and password, then click Login (Логин) button. Using Remember Me (Запомнить меня) option will help you to log in automatically without entering your credentials every time.
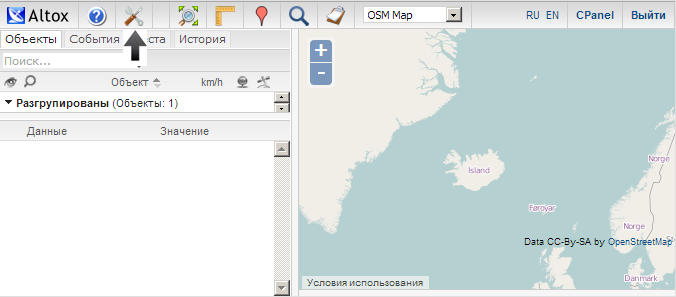
4. When you enter the system go to Altox server's GPS settings (a gear icon in the top left corner of the screen).
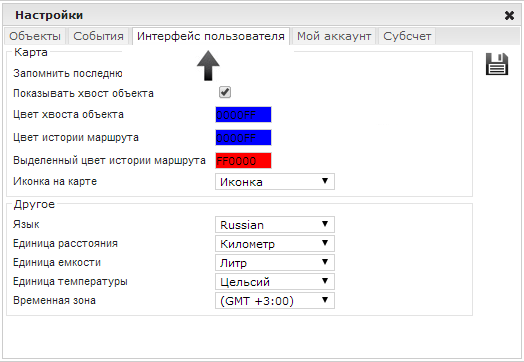
5. In the new window go to User Interface (Интерфейс пользователя) tab, make required changes and save them by clicking the relevant button.
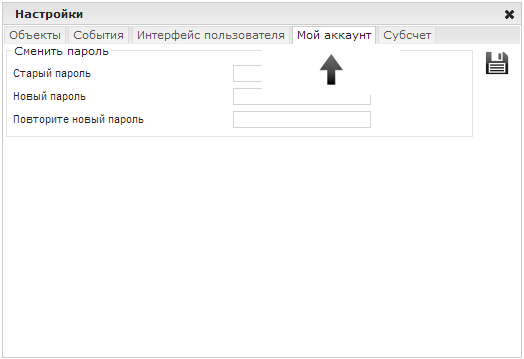
6. To change your password go to My Account (Мой аккаунт) tab, enter your old and new passwords and then click the Save button.
Add Drivers and Set of Objects
1. Enter Altox server's GPS settings menu (a gear icon in the top left corner of the screen).

2. In the new window go to Set of Objects (Группы объектов) or Drivers (Водители объектов), then in the bottom left corner click the + button to add a new set or a new driver, respectively.
3. In the new window fill in required fields and save changes.
4. You can assign the object to a set and indicate its driver in the properties of the relevant object.
Create and Set Up Monitoring Objects
1. Enter Altox server's GPS settings menu (a gear icon in the top left corner of the screen).
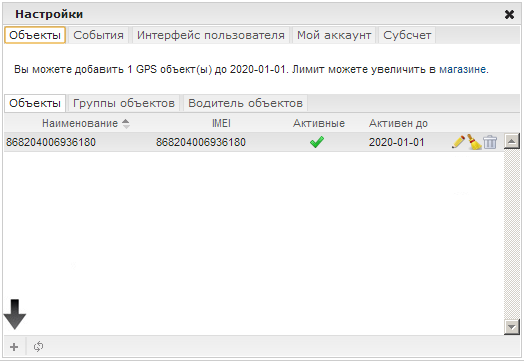
2. In the new window click the + button and then add the name of the object and the unique ID (IMEI) of the installed Altox GPS-GLONASS tracker (to identify the ID send a text message "ID1"to the phone number associated with the SIM card of the GPS-GLONASS tracker). When the information about location is transferred to the server, you will see the object on the map.
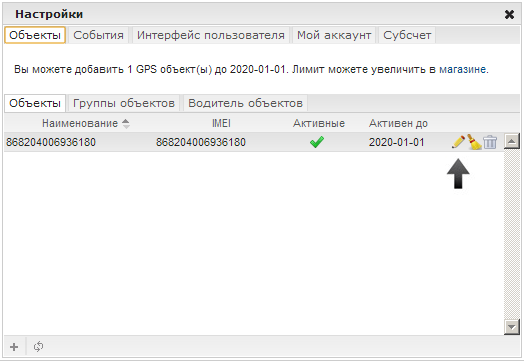
3. To edit the object's properties click the pencil icon in the settings window.
Note: clicking on the brush icon allows deleting the object's movements history (this function is only available to the administrator), clicking on the bin icon allows deleting the relevant object.
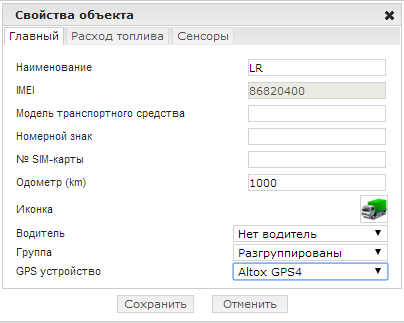

4. In the Main (Главный) tab you can change the name of the object, enter information about the vehicle's model, registration plate, phone number associated with the SIM card installed in the Altox GPS-GLONASS tracker, reset vehicle odometer's data, chose the icon with the car's image, indicate the driver's name that has been saved earlier, and the set of objects.
5. In the Fuel Consumption (Расход топлива) tab you can add relevant data for summer and winter periods separately.
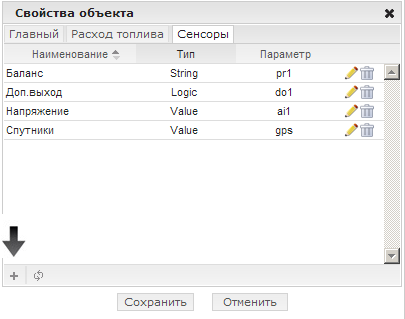
6. In the Sensors (Датчики) tab click the + button.
7. In the new window click the Standard (Стандарт) button to add standard sensors of the Altox Tracker-4 GPS-GLONASS tracker.
Create Geo Zones and POI Markers
1. In the main window of the Altox Server 2.0 GPS-GLONASS monitoring system go to the Locations (Места) tab.

2. To create a new geo zone click the button with a blue polygon.
3. On your left you will see a window with properties of the geo zone where you need to enter a name, choose a color and specify the visibility of the geo zone on the map and its name. Below in the yellow window you will see hints for creating a new geo zone: adding vertexes of the polygon can be done with a mouse click on the map, the last vertex is confirmed by the double click.
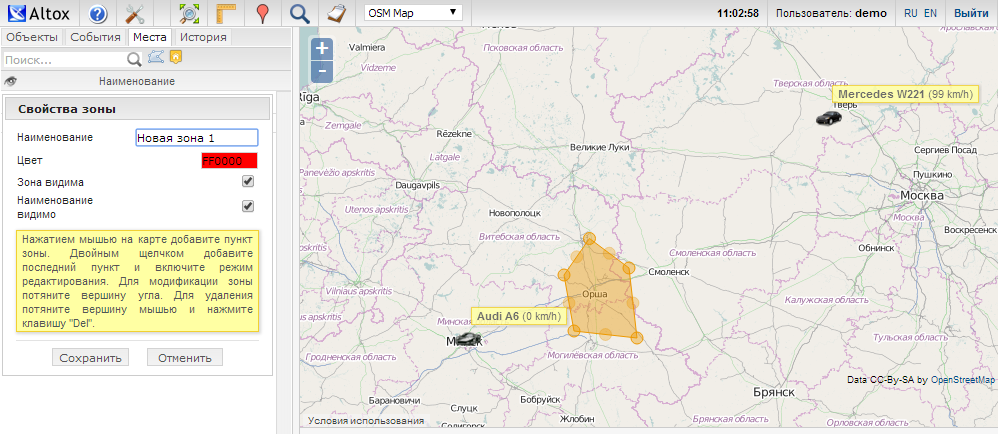
4. To move the vertexes of the polygon, click the relevant point and drag it.
To add a new vertex, click the point located in the center of one of the polygon's sides.
To remove one or more vertexes, click Delete button on your keyboard and then move the cursor to the relevant vertex.

5. To create a POI on the map, click the orange market button.
6. On your left you will see a window with POI properties where you need to add a name, indicate the visibility of the marker on the map and choose the relevant image.
Below, in the yellow window you will see hints for adding the marker to the map.
Note: to edit geo zones and POI properties, click the pencil icon opposite the relevant element, and to remove them click the bin icon.
Create Events and Notifications
1. Enter Altox server's GPS settings menu (a gear icon in the top left corner of the screen).
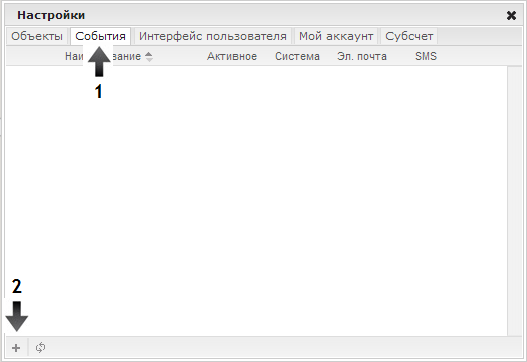
2. In the new window go to Events (События) tab and then in the bottom left corner click the + button.
3. Choose the event type: a) SOS - pressing the alarm button in the car interior; b) No connection - time period with no data from the GPS tracker; c) Exceeding or decreasing of the object's speed; d) Sensor - documenting changes in data; e) Arrival or departure of the object(s) to/from the geo zone.
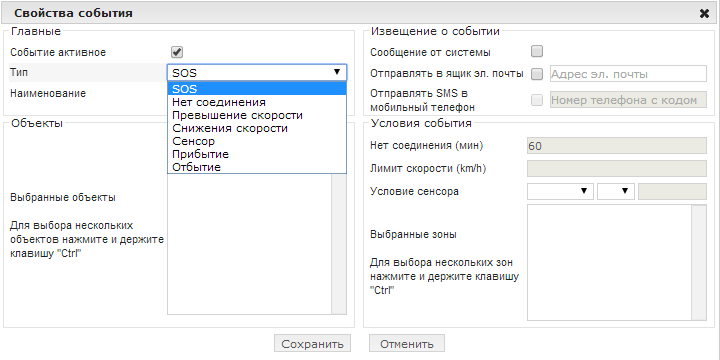
4. Choose one or more objects for this event.
5. Specify the method of the event notification: a) Notification from the system - pop-up window in online mode; b) Sending an email message to the user; c) Sending a text message to the phone (deactivated, GSM gateway required)
6. Specify conditions for the separate event: a) time period with no data from the GPS tracker in minutes; c) speed limit to document exciding or decreasing of the speed; d) sensor parameters conditions; e) choose a geo zone to document the arrival or departure of the object(s)
Display and Replay of the Object's Movement History
1. In the main window of the Altox Server 2.0 GPS-GLONASS monitoring system go to the History tab..
2. In the field Object choose the relevant vehicle.
3. For the quick adding of the date you can use a filter (today, yesterday, etc.).
4. Choose the beginning and the end of the period to display the history of movements.
5. Specify the time of stops and the inclusion of stops and events in the report.
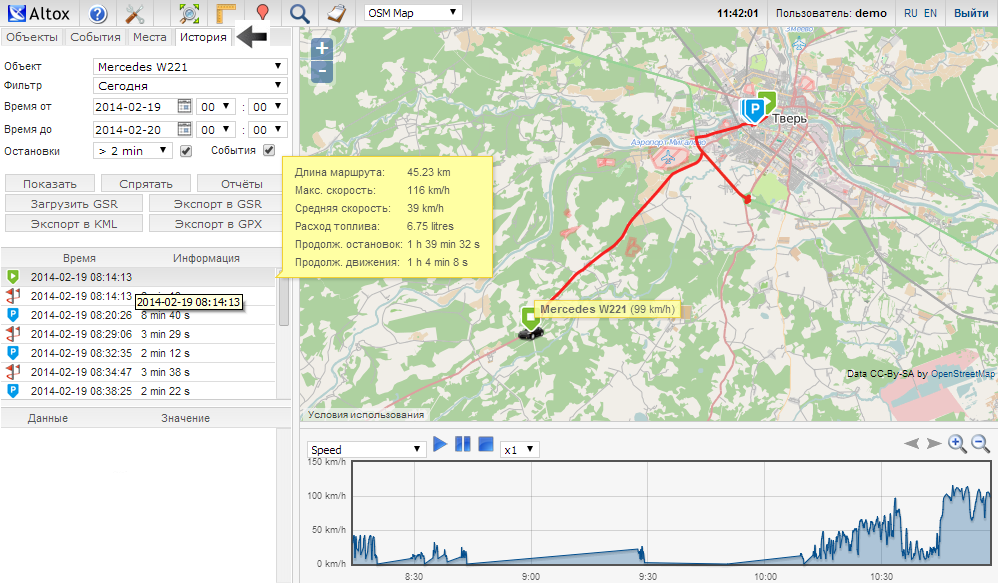
6. Click Show (Показать) button to display the history of movements on the map, the calculation of the fuel consumption, the events and stops. Here you can also load previously saved history of movements in the GSR format. as well as export (save) it in GSR, KML and GPX formats in order to load the movement routes into other monitoring tools.
7. When the movements history is displayed on the mpa, on the left side in the window you will see information about all stops, movements and events for the indicated time period, and at the bottom you will find a chart for different parameters (speed, voltage, satellites, sensors, etc.)
8. To see the route distance, the maximum and average speed, fuel consumption, duration of all movements and stops, hover the cursor to the line with a green triangle in the beginning of the list or with a green square in the end of the list. In the drop down yellow window you will see the relevant information.
9. To see the data related to the distance, maximum and average speed and fuel consumption for a specific route, hover the mouse cursor to the line with two red flags. In the drop down yellow window you will see the relevant information.
10. To highlight and center certain elements on the map, click on the relevant line.
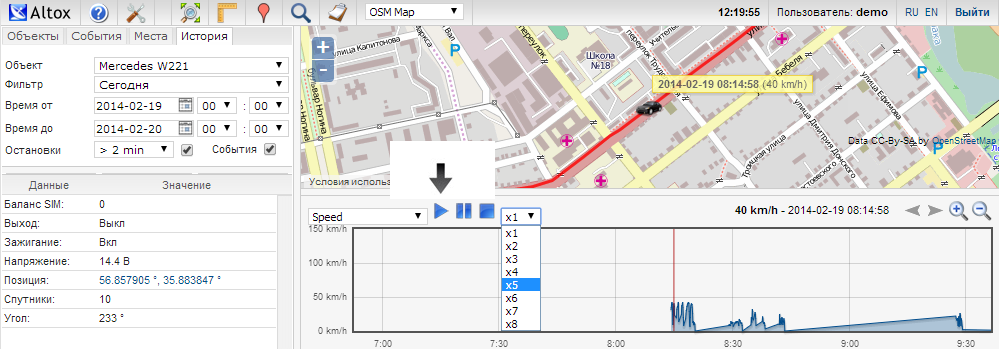
11. To replay the history of movements, click Play button (blue triangle) that is located above the charts window. Here you can pause, stop and fast forward the play for up to eight times.
Objects Monitoring and Controlling Functions
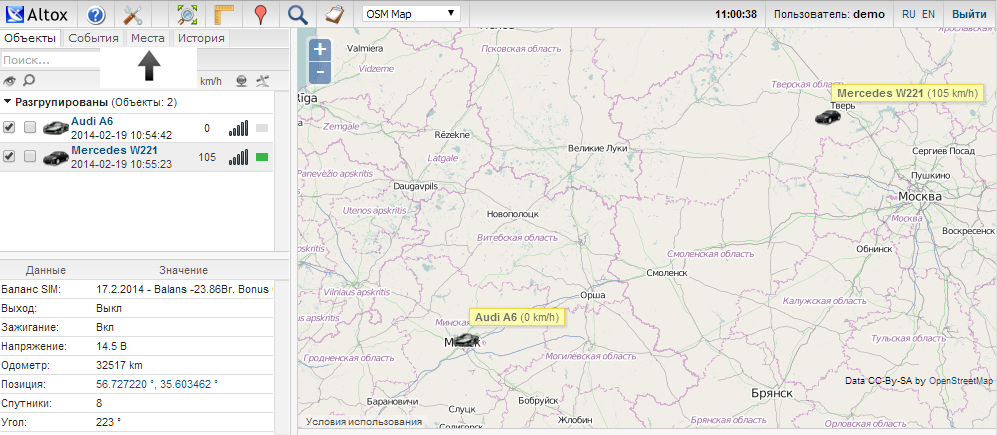
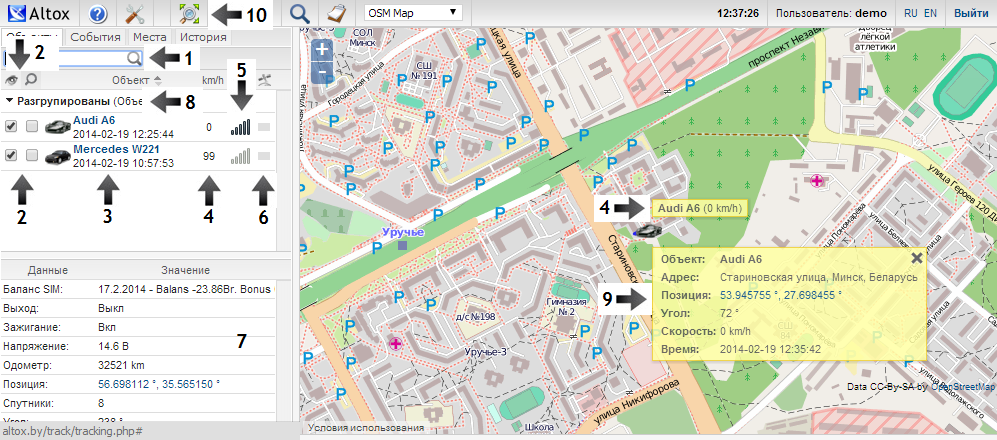
1. To your left in the main window of the Altox Server 2.0 GPS-GLONASS monitoring system you will see all registered objects. To filter certain objects use search by the name.
2. The first checkbox in the line of the object is responsible for displaying the object on the map (to check or uncheck the box use the button with an eye image). The second checkbox in the line of the object allows you tracking the object's movements: an object is centered and the map is mobing along the object(s) (to check or uncheck the box use the button with a magnifying glass image).
3. For each object its name and the time of the last message with its location are specified.
4. In the line of each object, as well as above the object on the map, its speed is indicated.
5. In the line for each object you will see an antenna that indicates the time of the last data transfer (up to 10 minutes after receiving of the last data packet - it is black, more than 10 minutes - white, more than 24 hours - red).
6. Also, in the line of each object there is a button that allows controlling Altox GSP-GLONASS tracker via TCP commands (green - up to 1 minute since the last data packet has been received, and grey if the time period exceeded one minute). When you click this button, a control window will open (see below)).
7. In the bottom left corner all parameters of the selected object are displayed (to select an object click on the corresponding line in the objects list). Here you can find information about the account balance for the SIM card installed in Altox GPS-GLONASS tracker, the status of the additional output or the safety switch, car-system voltage, odometer, a link with coordinates on Google Map, amount of satellites, vehicle-course angle, name of the driver and other data.
Note: when clicking on the driver's name in the top right corner you will see a window with previously saved information about the driver.
8. For the more convenient view of a large number of objects you can group and collapse them.
9. When clicking on the object's image on the map, a yellow window with information about the object will open. This information will also include the location of the vehicle.
10. To locate all objects in the center of the map, click the button with an image of a magnifying glass and green triangles in the top left corner.
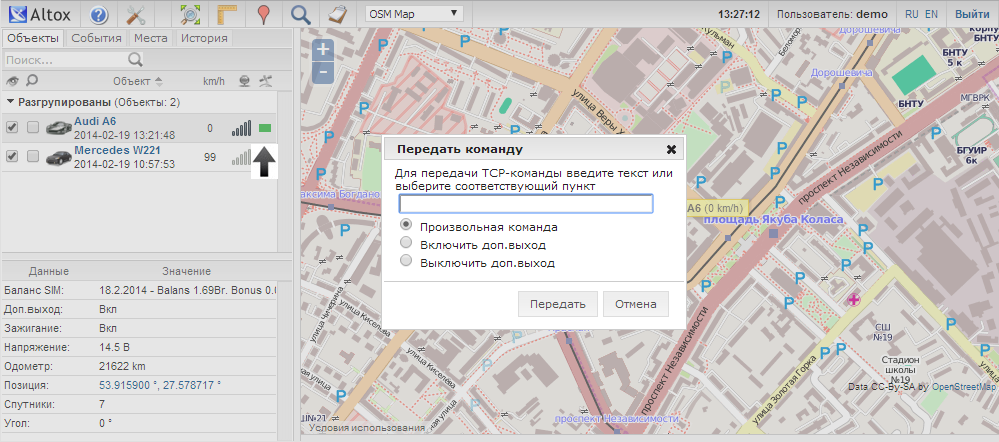
TCP Commands Transfer
After you click the button in the line of the relevant object that allows controlling of Altox GSP-GLONASS tracker via TCP commands, a window for the command transferring will open where you can enter a command (send settings or process USSD request) or control the additional output (safety switch or other functions). After you have entered or chose a standard command, click Transfer (Передать) button;. All changes can be controlled in the window of parameters of the relevant object in the bottom left corner (see point 7).

Change Maps, Search for Address and Other Functions
1. In the top part of the GPS monitoring system's windows you will see various functionality buttons with informations about the system and other purposes. The button with a question mark image is a link to the user manual for Altox GPS Server monitoring system .
2. The gear icon opens settings menu.
3. The button with a magnifying glass image and green triangles centers all objects on the map.
4. The button with a ruler image allows measuring distance on the map. To draw a curve you should use single clicks on the map. To finish the drawing you should use a double click. The system will automatically calculate the distance. To disable the ruler option, click the button with its image one more time.
5. The button with a red flag image allows to find the location on the map based on the coordinates.
6. The button with a blue magnifying glass image allows to find the location on the map based on the address.
7. The button with a notebook image allows entering the reports menu.
8. In this field you can choose various maps (satellite,hybrid and others).
9. In the top right corner next to the login you will see Altox GPS-GLONASS monitoring server time.
10. To change the language of Altox Server 2.0 GPS-GLONASS monitoring system, click the corresponding button in the top right corner.
11. To hide or display the left and the bottom panel click on the red line.
Sub-Account Sign Up
1. Enter Altox server's GPS settings menu (a gear icon in the top left corner of the screen).
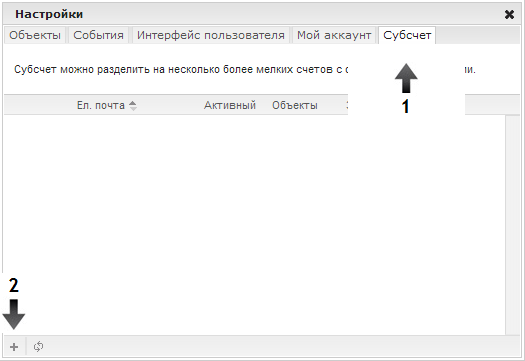
2. In the new window go to Sub-Account (Субаккаунт) tab and then in the bottom left corner click the + button.
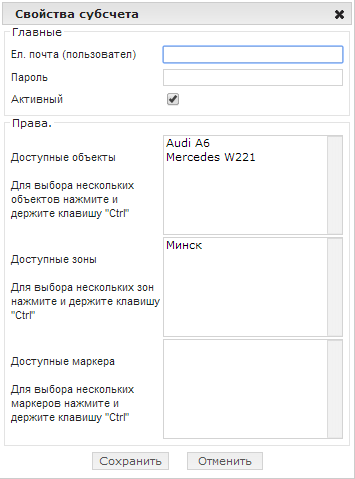
3. In the properties of the additional user add his/her email, password, and specify objects, geo zones and POI markers he/she has access to