ALTOX HEATER
Overview
The Internet-application ALTOX HEATER allows you to control the parking heater via Internet in the real time mode using GSM device ALTOX WBUS/EBUS (series 4 and 5), and to track the location of your car (for devices with an integrated GPS-GLONASS module).We recommend saving the URL of the Internet-application on your smartphone or tablet: http://altox.ru/app

Device Settings
For the device ALTOX WBUS/EBUS to work in the GPRS mode, it is required to: 1. Set an APN in accordance with the mobile operator’s settings and your mobile plan by sending an SMS command to the SIM card in the device: «APN1:internet,APN2:login,APN3:password», where internet is name of APN, login is username of APN, and password is password of APN.If the values for login and password are not used, you send an SMS command without these values: «APN1:internet,APN2:,APN3:». 2. In response, the device will send an SMS command with SMS settings and a unique ID. Check your APN, IP address and server port values 85.114.140.44 and 20332. To change these settings, send the following SMS-command: «SERVER1:85.114.140.44» and «SERVER2:20332».
3. ALTOX WBUS-4 will switch to the GPRS mode in one minute. To switch to a manual mode, switch off the power supply and turn it on again or call the device using the SIM card number and using the voice guide enter the combination of characters: * # 0 #.ALTOX WBUS/EBUS-5 will switch to the GPRS mode instantly.4. The LED in the SIM card slot will start blinking fast, and then will start blinking slower. If the LED is constantly in the fast blinking mode, the device does not have access to the Internet.

Registration
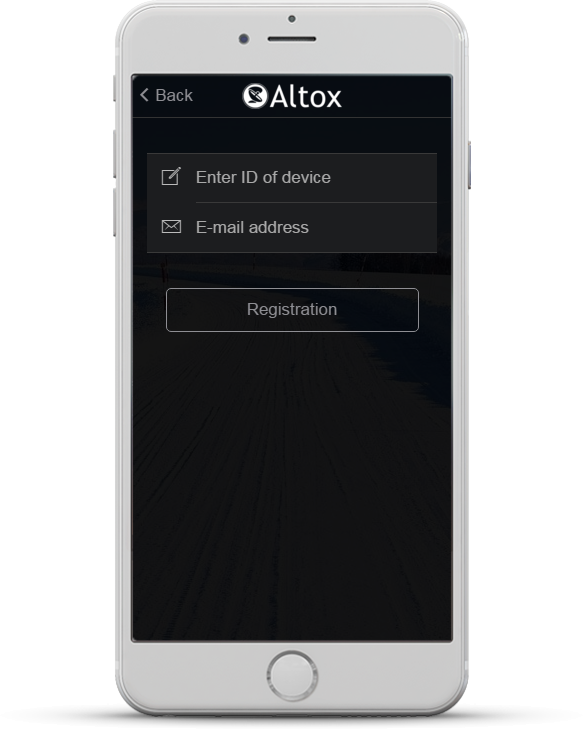
Click on the menu button in the main application window in the upper left hand corner, then click on the tab «User Settings». At the bottom of the window click «Registration», then enter a unique ID, your E-mail address and click on the registration button. You will receive an email with a password. If you have not received the email, check the Spam folder.If you see a message saying that there is no ID in the system, it means the device does not have access to the Internet.
In this case, you should check the following:— If mobile data service is included in your plan and is enabled (contact your mobile provider);— If the APN, IP address and server port values is entered correctly in the device settings;— If the mobile provider disabled the service because there is not enough money in your account.Note: it is recommended to use special plans for M2M equipment.
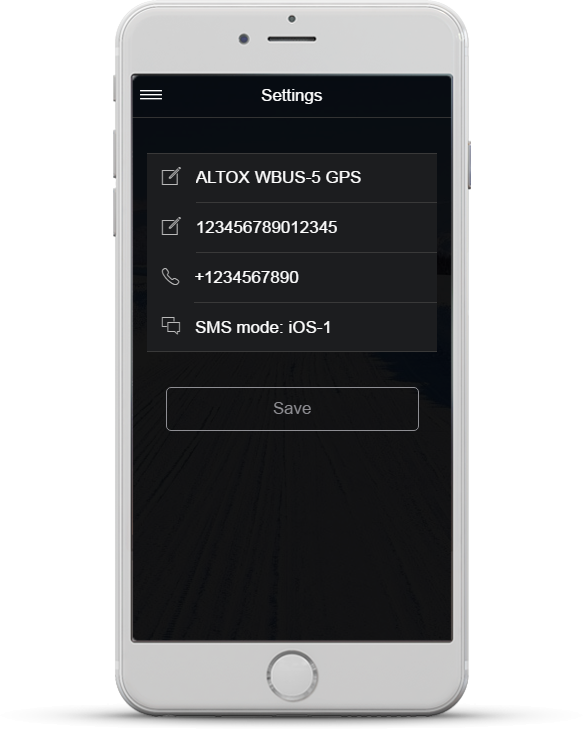
Application Settings
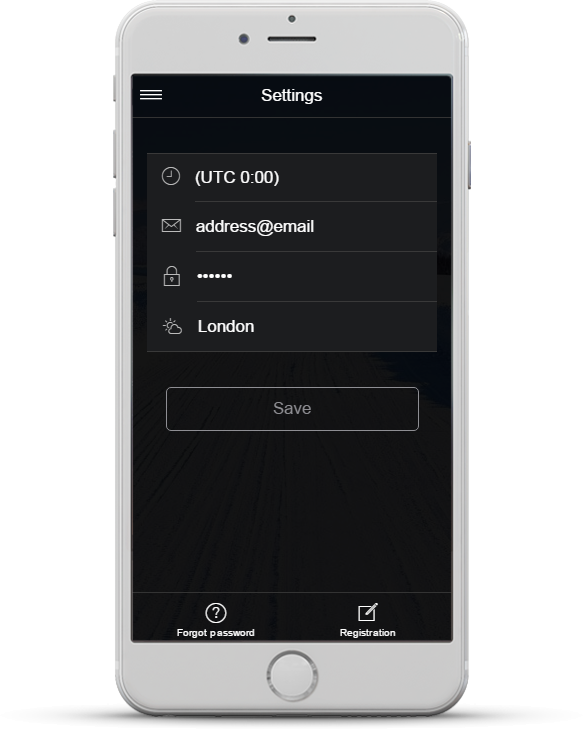
Click on the menu button in the main window in the upper left hand corner.In the «User Settings» specify: 1) Your time zone 2) E-mail address entered during registration 3) The password specified in the email received after registration 4) The name of the city to display weather forecast forIn the «Application Settings» specify: 1) The model of the ALTOX WBUS/EBUS GSM device 2) Unique ID of the device (you can request it using the SMS command «SETTINGS2») 3) The phone number for the device 4) SMS commands redirecting mode, depending on the model of your smartphone
Heater Control
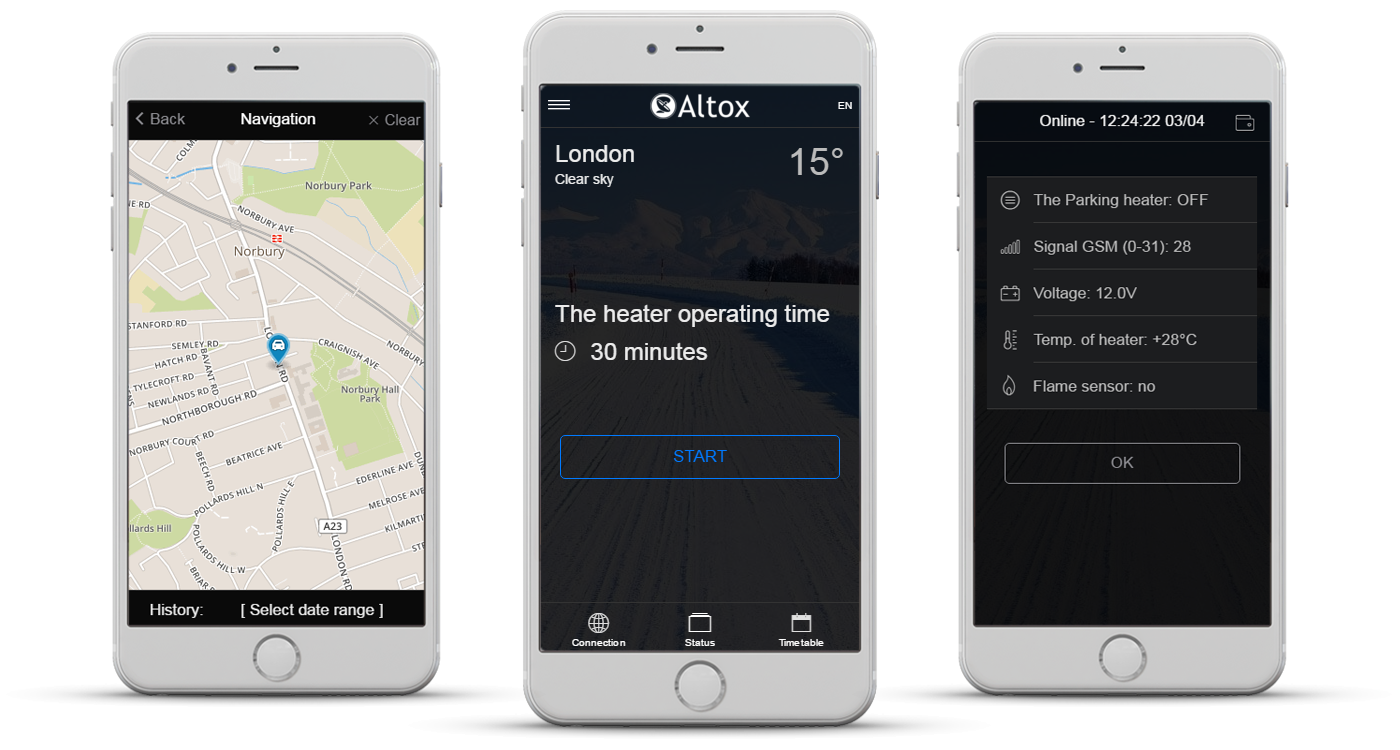
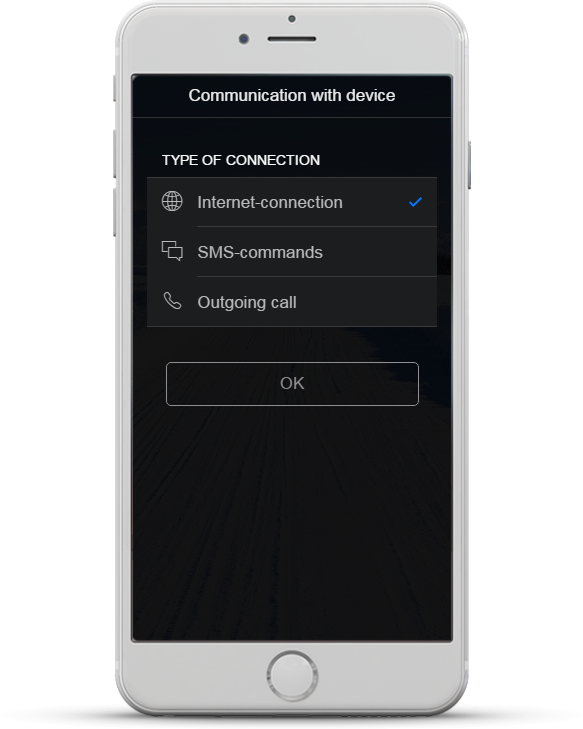
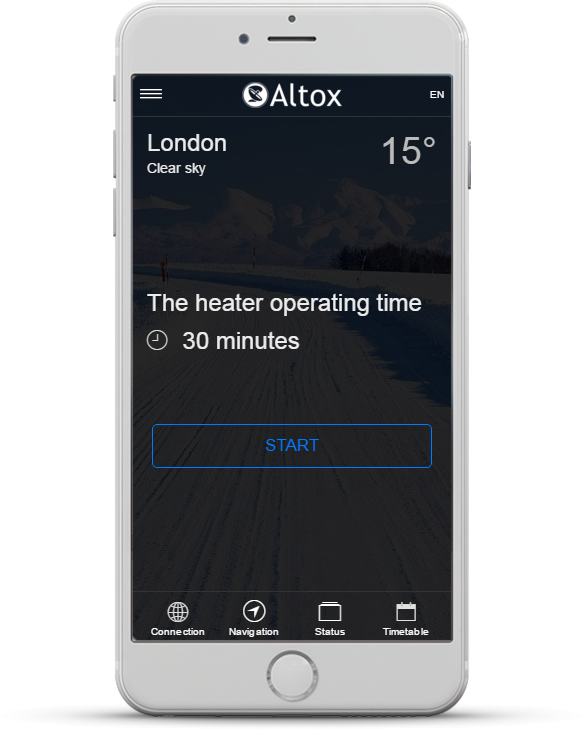
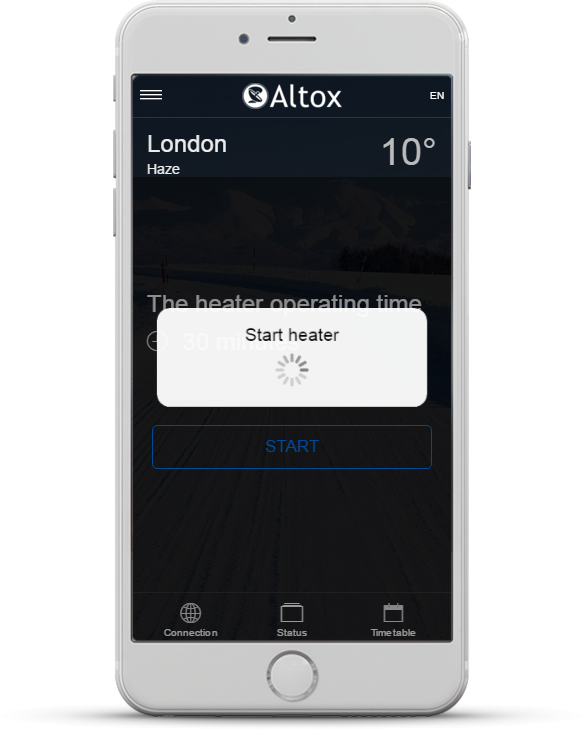
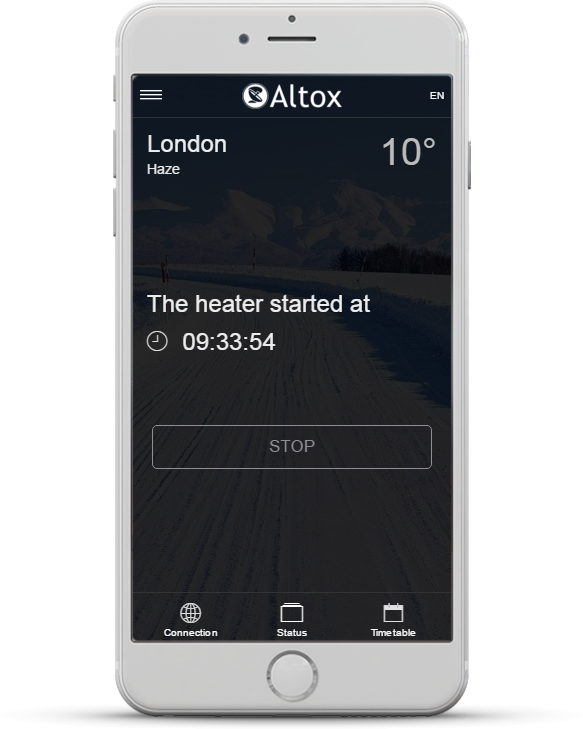
Click on the «Connection» button in the lower panel of the main window, then select Internet connection, SMS commands or Outgoing call.To start the heater, specify in the main window of the Internet-application the required operating time of the heater and click on the «Start» button.To stop the heater, click on the «Stop» button in the main window.

Current Status of the Device
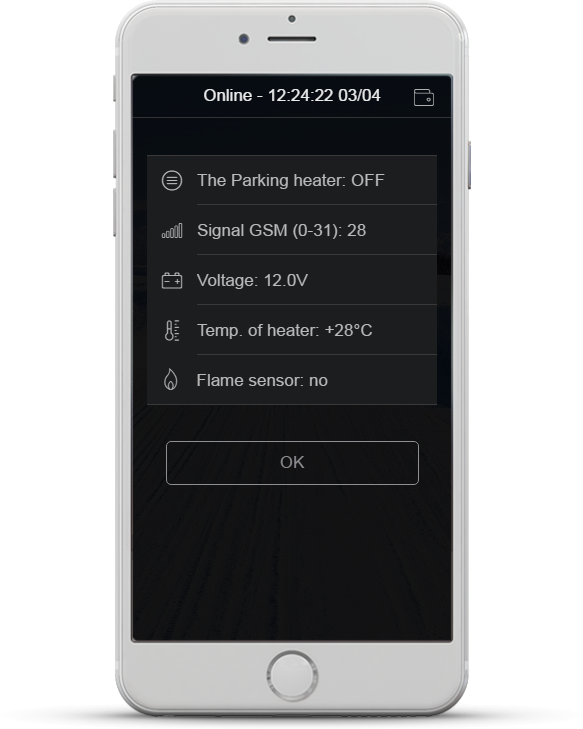
Click on the «Status» button in the lower panel of the main window.The header displays the connection status, time and date of the request, and a button to display the account balance (if such data is available).This section displays the following options: — The current status of the heater — The reception level of the GSM signal (0 to 31) — Battery voltage (only on digital heaters and ALTOX WBUS/EBUS 5 series) — Heater’s temperature (only for Eberspacher / Webasto digital heaters) — External sensor’s temperature (only ALTOX WBUS/EBUS 5 series) — The status of the flame sensor (only for digital heaters)
Scheduled Start Up
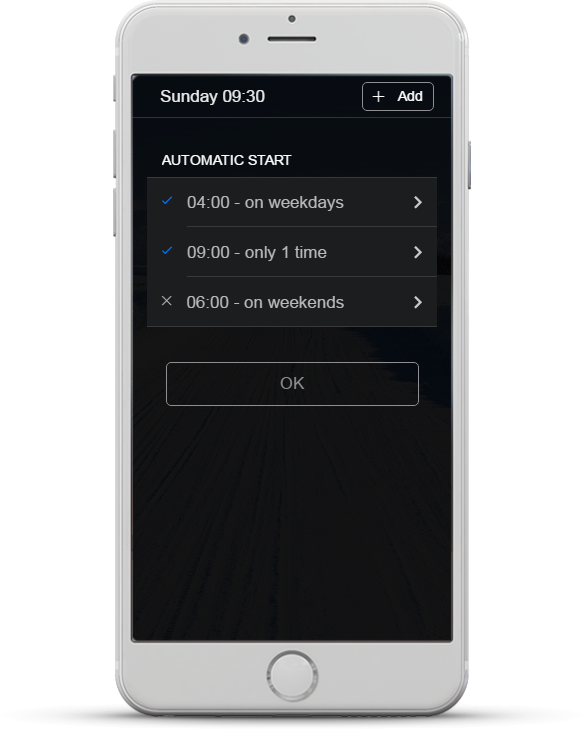
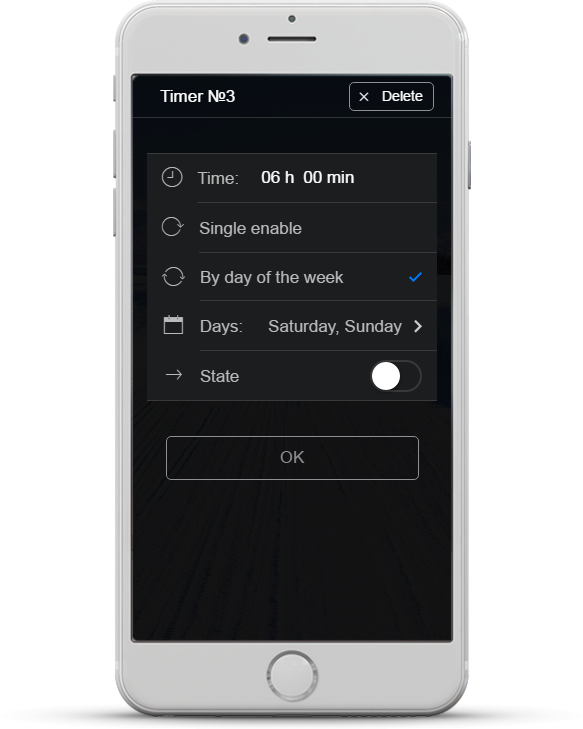
Click on the «Schedule» button in the lower panel of the main window.This section displays a list of automatic start up timers for the heater.To create a new timer, click on the «Add» button in the upper right hand corner and then specify the start time for the heater, the operating mode (day ahead or according to the day of the week) and the status of the timer (active or not).To edit the created timer tap the box indicating the start time of the heater and then change the settings. To delete timer click on the «Remove» button in the upper right hand corner.
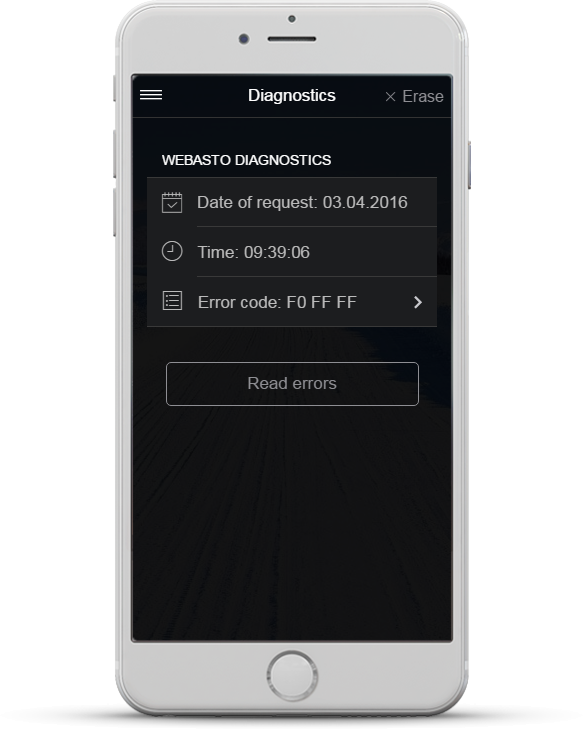
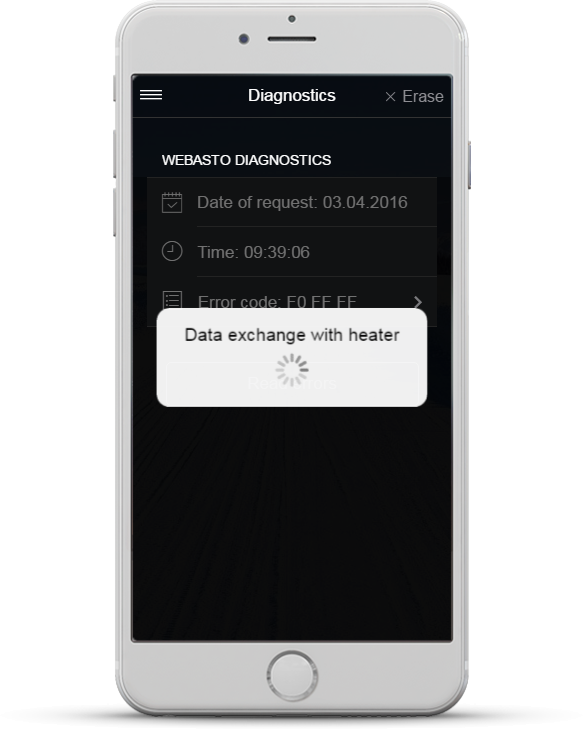
Diagnostics of the Heater
This function works only for Webasto and Eberspacher digital heaters.Click on the menu button in the main window in the upper left hand corner, and then select the «Diagnostics» section. To read and delete heater’s errors choose the corresponding button. If there are no errors, the value displayed is «none». Click on the line with the error code to go to the table with descriptions and recommendations.
The location of the car
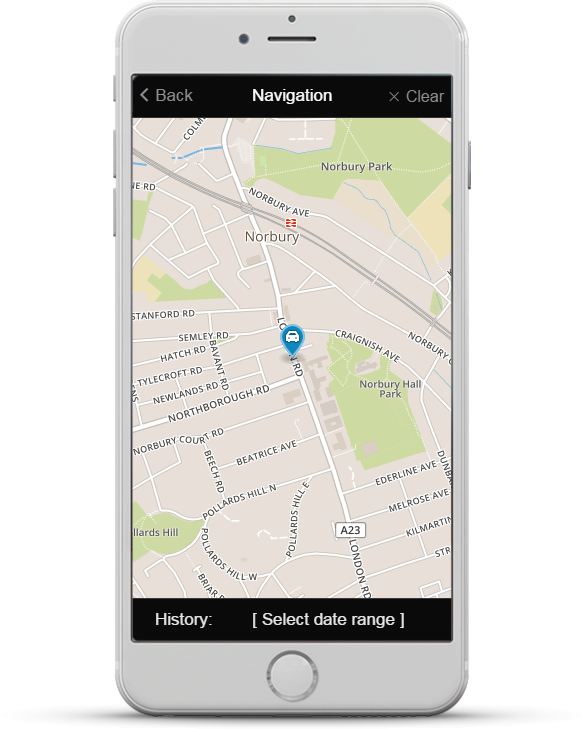
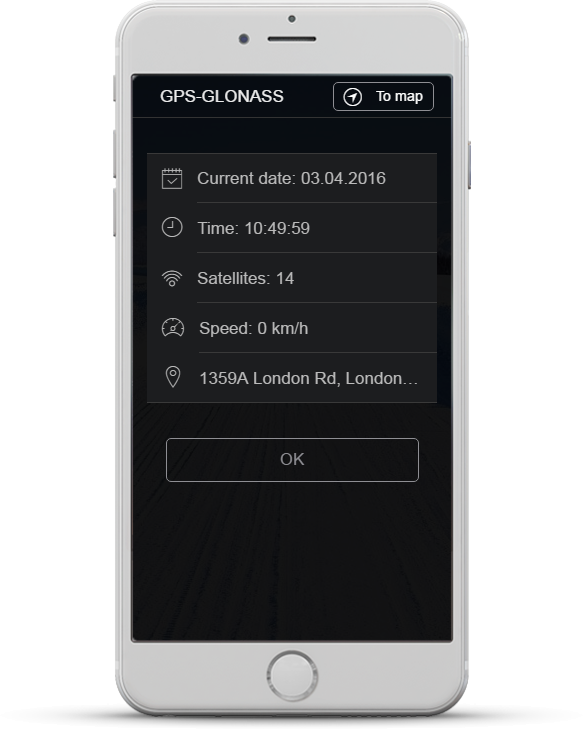
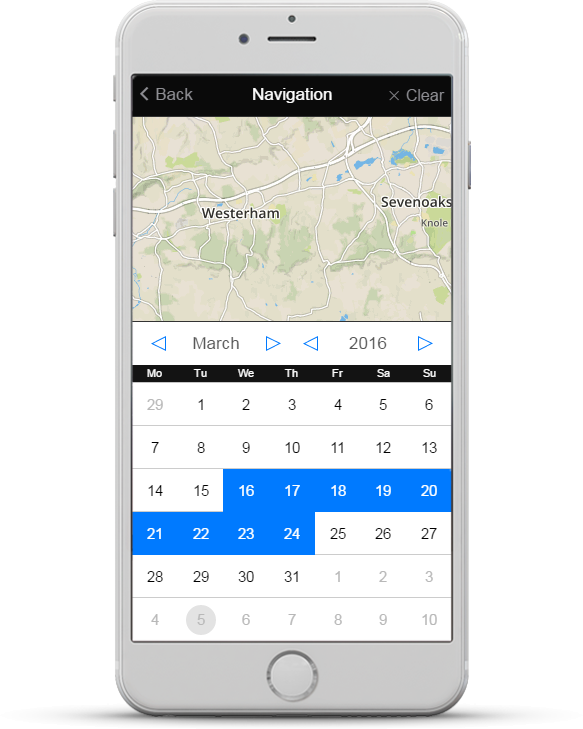
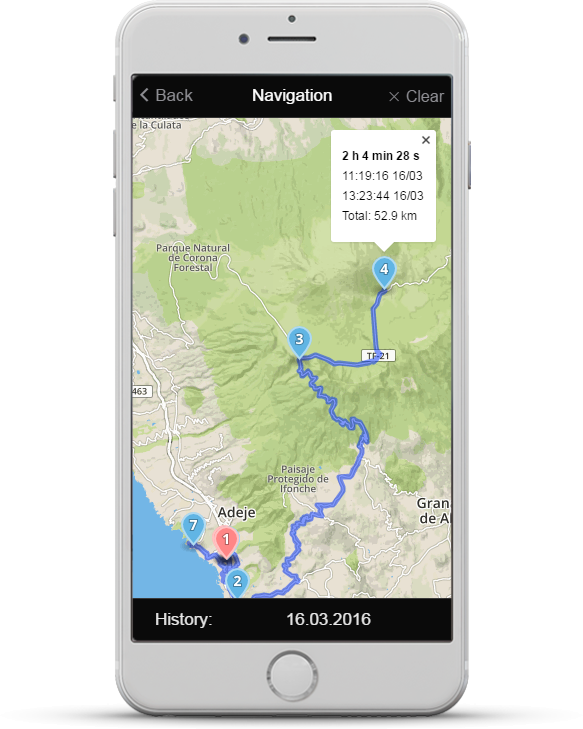
This function allows to define the location of the vehicle based on the base GSM stations (for ALTOX WBUS-4 v2 and ALTOX WBUS/EBUS-5) and/or based on the satellite GPS-GLONASS signal (for ALTOX WBUS/EBUS-5 with an in-built GPS-GLONASS module).In the main window on the bottom panel click «Navigation» button.In this section you will see the date and time when the location has been determined, the address, as well:- the number of captured satellites and speed if there is a satellite GPS-GLONASS signal;- location accuracy in meters, if location is determined based on the base GSM stations.To display the location on the map press the corresponding button in the top right corner.When clicking the car's marker the current speed and location accuracy will be displayed.Upon the activation of the Tracking mode, your device ALTOX WBUS/EBUS-5 GPS (SMS command TRACKING1) will have the ability to document all movements of the car. To load the movements history click the bottom panel and choose the dates range. Then, to close the calendar, click the map and if there is history for the selected period, it will be displayed on the map.The first stop is marked as 1 and each next one will have a number increased by one. When clicking on the marker the total duration of the parking in the current location will be displayed, time of the beginning and the end of the stop, as well as the total distance from stop 1.
Restore access to the application
1. Request the device ID by sending the “SETTINGS2” SMS command to the module.2. In the user settings, at the bottom of the screen, click on the "Forgot Password" button, fill in the ID, Email and press the restore button.
3. Password received by Email, enter in the user settings and fill in other settings fields.
Updating settings in the Altox Heater, selecting a server in the application and in the module
We updated the Altox Heater application and added a more powerful s1.altox.ru server to the system.The essence of the update is to automatically switch your module and application to a new server. In the case of controlling the same module from several telephones, switching to a new server must be done manually.Server selection in the updated application is carried out in the application settings menu using the button located in the upper right.The server in the module is selected by changing the IP address of the SMS with the SERVER1 command.For the application to work with the module, the same server must be selected in the module and in the application.If s0.altox.ru is selected in the application, the address must be configured in the module with the command SERVER1:85.114.140.44If s1.altox.ru is selected in the application, the address must be configured in the module with the command SERVER1:89.163.210.119